Adding a Holding Tank
April 17th, 2010 | by Marilyn | Published in Upgrades | 2 Comments
It was a major project to add a holding tank – it took about 4 months and touched so many areas of the boat. But it’s finally done, and I’m happy with the outcome. Van is more fearful that it will start leaking, maybe because he’s the one who has to fix it if it does.
Let’s start at the beginning of the story. Back in December 09, just after bringing Rainshadow to her new home port, we decided the first project was to install a holding tank. Where, is a big question, and of of course how. The “how” and “where” questions are closely linked, and after doing a lot of reading on the complications of installing a holding tank where a pump is needed to move the contents overboard, we settled on installing it above the thru-hull so gravity could allow it to be drained overboard when we’re offshore. That’s one month gone to make that “where” decision!
“How” took the month of January. That is, how could we stuff a suitable size holding tank into the area directly over the thru-hull, which is below the sink in the head. We took out the cubbyhole cabinets, removed the sink, and took loads of measurements. I spent hours pouring over listings of “off-the-shelf” polyethylene holding tank sizes to find one that would fit in our area. Figuring it out was a lot harder than it sounds because nothing is square and the permutations seemed endless. But after much deliberation and thinking through the process of the actual act of installation, we settled on the area directly behind the sink. We chose a 13 gallon holding tank from Plastic Mart, with a polypropylene ball valve from Banjo at the gravity tank outlet. The deck fill for pumping out at marinas would be directly above the gravity outlet, so if it ever gets clogged, we can shove a snake down from the deck fill to clear the outlet line. We also designed in two 3/4” vents so we get a cross-breeze for good aerobic bacteria growth (minimizing the stinky anaerobic bacteria and therefore the odors). A plan, finally.
February and March were lost to waiting for Plastic Mart to deliver a tank that was the full 3/8” thickness promised on their website. The first tank arrived after 4 weeks, and it weighed 1/2 what it should, with a wall thickness of ~0.19”. We weren’t going to accept this, so after many more phone calls, they begrudgingly agreed to make a new tank with the promised 3/8” thickness. They swore that “no tanks are 3/8” thick” to which I asked “then why do you advertise they are 3/8” thick?” After another 3 weeks, a heavy 3/8” thick tank arrived. Hurrah!
March was not completely lost, because while waiting for the tank, Van installed a Jabsco Pumpguard water strainer on the Lavac toilet inlet (to keep down marine growth in the rim of the bowl), and also a new Whale Mark V waste manual pump. We decided to replace the original Mark III pump because it had a seriously bad smell after being permeated with head odors for so many years. Rebuild kits were still available, but for some reason, we decided on a new pump. Van also was able to replace the failed toilet inlet hose spigot, as reported in an earlier posting. So, the inlet plumbing did get done during March.
Van was also able to get the vent thru-hulls installed during some good early spring weather. We added two nice 316 stainless steel barbed thru-hulls near the toe rail. There’s a couple nice pictures of that work below, which involved drilling holes in the hull near the fiberglassed deck joined. The hull turns out to be about 3/4” solid fiberglass in that area, so we decided no backing plates were needed.
The day the proper holding tank arrived, we started on the installation. Van used a lot of rigid PVC because it has the benefit of not having plasticizers that allow the pipe to smell after a few years. It took a lot of joints to install flexible hose at fixed connection points (such as the toilet, pump and thru-hull) and rigid between in the longer runs – something link 18 joint I think we counted. Each joint of which could fail as the boat flexes, but Van’s much more worried about that than I am because Rainshadow is a still ole’ boat. We found the custom hose adaptors from Sealand (p/n 341513) to be invaluable for connecting hoses to rigid PVC (best price I could find is at Good Boat Gear). They work well because the so-called “flexible” sanitation hose actually fits on them, in contrast to standard 1.5” PVC ribbed hose barbs that fit only in theory.
After a few days, Van finished the installation of all bits, except the deck fill. (That’s so easy to say, but it was very hard work in tough quarters!) We had to wait a week for that due to depressing rainy and cold weather. Finally, on a lovely Saturday that would have been perfect for sailing, we decided it was the day to drill the 2” hole in the deck for the waste deck fill. Funny name that – deck fill. It’s used for pumping out the waste, never filling. But all other similar looking things on the deck are used for filling, such as the water tank filler and the diesel tank filler, so I guess the name just stuck. Each deck fill is clearly labeled so you do not accidently pump diesel into your holding tank, for example.
After the deck fill, installation was still not done. Van had to put on the new cover boards that hides this mess of plumbing, and reinstall the sink. The cover boards have some nice peep slots to allow us to tell how full the tank is. He drilled a couple hole in the bulkhead aft of the tank so we can shine a flashlight in, and peep through the slots.
Installing the sink required replumbing everything. We tried to rebuild the faucet valves while we were at it, but it turns out they are some odd valves that were not recognized by the plumbing expert down at Henery’s Hardware. They seem to work still, though no one could quite figure out why since the plunger part is lose. Anyway, Van did get the sink reinstalled, gluing it down with some acrylic-silicone kitchen caulk. Once the sink was back in, Van held his breath while I turned on the water pump to pressurize the fresh water system for the first time. After tightening a few things here and there (and discovering that the shower plumbing needs a complete overhaul!), we now have pressurized water on the boat too. How civilized is that!
Even though this is a long post, it comes no where near explaining the complexity of this task. Every step of the way was one challenge after another. It is soooooo nice to have it done. Now let’s just hope it stays functioning flawlessly for a long time, because we certainly don’t want to have to repeat this task.
-
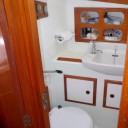
- This is how the head looked before we started. The wood cubbyhole cabinet above the sink became victim to our holding tank project.
-
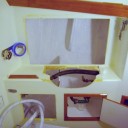
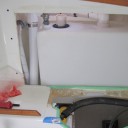
- This is how the head looked after we started digging in. It looked like this for about 3 months.
-
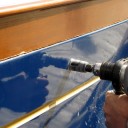
- Van’s drilling holes in the hull again! This is for the vent thru-hulls.
-
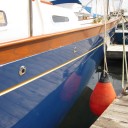
- The two new 316 stainless steel thru-hulls that are for the holding tank vent lines.
-
- Here’s the holding tank in position, with some of the plumbing visible. We had to route out the opening to get the large tank through.
-
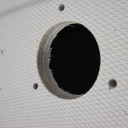
- The hole drilled in the deck for the waste deck fill. This shows the nice thick solid fiberglass deck. The hole is 2″, with the pre-drilled #10 bolt holes outside.
-
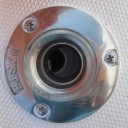
- The waste deck fill after installation. The cap is not in place for this photo.
-
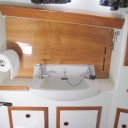
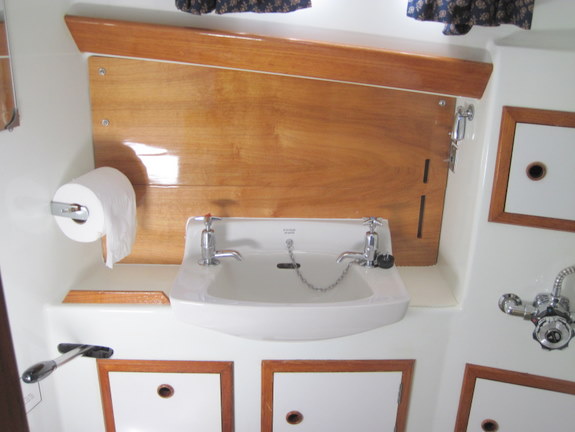
- Finally, the holding tank is done! Note how the left lower square door has been turned 90 degrees. That allows the door to clear the toilet lid. Clever Van!
December 29th, 2010at 1:01 am(#)
There’s a very good thread on Cruiser’s Forum about using PVC instead of sanitary hose.
http://www.cruisersforum.com/forums/f115/sewage-hose-or-pvc-pipe-52035.html
As of 12/29/2010, everything is still leak tight. 🙂
May 13th, 2014at 11:30 am(#)
If you installed a composting toilet it would have been faster and much cheaper. We installed one on our boat 5 years ago. No holding tank, no smell. Solid waste tank gets changed once every 4 months. When we are at a marina we simply empty the tank (5 gallon sized) into a black trash bag (Smells like musty earth) and throw it away. Or if we’re out at sea just dump it overboard. No chemicals, no chance of leaks and no smell.