Pulling Chainplates
February 25th, 2010 | by Marilyn | Published in Maintenance and Repairs, Rigging | 2 Comments
As Brion Toss said at this year’s Seattle Boat show, if your boat is more than 20 years old and has spent any time at all in warm climates, you have to pull those chain plates. So during that nice sunny spell we had recently, we did pull a few, and Brion was right – the chain plates need some TLC. To get to the punchline early, the ones we looked at are not ready to fail. But of course you want to know the whole long saga so keep reading.
For those of you who are not up on your sailboat terminology, a chain plate is the hardware mounted to the hull that is the bottom attachment point for the wires (i.e. standing rigging shrouds) that hold the mast in position. So – if a chain plate fails, there is a good chance you are going to lose your mast because you have lost part of the support that holds the mast up. According to BoatUS, something like 40% of dis-mastings are caused by chain plate failures.
A typically failure is due to corrosion, especially for chain plates that go through the deck to their attachment point on the hull. What happens is that where the chain plate goes through the deck (you know, the bit you cannot see when the chain plate is in position), if water leaks in there, you can get anaerobic conditions that result in a particularly insidious type of stainless steel corrosion called crevice corrosion. If you remove the chain plate so you can see this hidden area, you can see if crevice corrosion has occurred. It looks like pits on the surface, but those pits can be very very deep, eventually weakening the chain plate to the point that it can no longer support the tension load of the shroud attachment. Then – BANG – the chain plate fails and you hope you are no where near the tensioned shroud when that happens.
Nicholson 38s are ketches, so they have two masts – that is, a main mast and a mizzen mast. That means lots of standing rigging and lots of chain plates. Rainshadow has 12 chain plates plus a main mast forward stay attached to the stem fitting at the bow, and a main mast back stay that is attached at the mizzen mast deck step. In other words, its going to be a lot of work for us to pull twelve chain plates, and a lot of money if they need to be replaced. Makes you think about how cool carbon fiber masts are because they don’t require any standing rigging. Anyway, our masts are aluminum and there is lots of standing rigging to inspect, so we started by pulling just 3 chain plates that were easy to access from below deck.
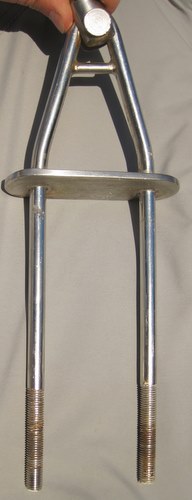
On Nic 38s, the chain plates are inverted V shaped rods (or hairpins as some people all them) that have threaded ends. They are attached to the hull by having a “piercing” that goes through a knee that is glassed onto the inside of the hull. So, the inverted V goes through the deck, leaving the bottom of the V above deck to attach a shroud, the welded-on plate at the deck level to permit a good seal with adhesive, and the legs of the V below deck, where they go through the stud that pierces the knee, and then there are nuts to secure the inverted V in position. Clear as mud? Look at the pic above. Its a unique design as most sailboat chain plates are straps bolted to the bulkhead, but the Nic 38 design appears to be rather robust and less liable to fail from a rotted bulkhead. I think the Nic 35 has something similar, but its chain plates go to a backing plate under the deck, rather than to a stud that peirces a glassed on knee.
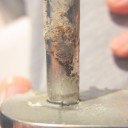
We started by pulling the main mast starboard forward lower shroud (we call it S1 for short), which was accessed in the Head behind the sink. It was reasonably easy to reach the nuts below deck because we already have this area exposed for our waste water holding tank adventure (which is another saga in the making that has not been reported here yet). We loosened the turnbuckle to remove the tension on the shroud so we could move it off the chain plate, went below to remove the nuts, and then came back on deck to give the chain plate some gentle persuasion to come free from the adhesive that should be sealing the area from water penetration. It came loose more easily than we thought it might, compliments of the builder using a reasonable adhesive rather than something outrageously permanent like 3M 5200. Amazingly, after 35 years, that adhesive still have about 2x elasticity and was forming a relatively good seal. But not good enough, because the rod part of the V that went through the deck had a lot of corrosion on the surface, which you can see in the photo gallery below.
We could easily scrape off that surface corrosion, and the rod looked nice an shiny again, but close inspection showed a different story. There they were – the tell-tale tiny pits of crevice corrosion. You can see them in the pictures below. So we pulled a couple more chain plates, and saw similar corrosion problems – though fortunately not as bad as this first one. (We pulled the port side main forward lower, and the starboard main aft lower.)
After a few days of pondering what we should do, we decided to take our handy Dremel tool and grind out the pits so we could see how deep they went. This would also halt the crevice corrosion that had started because without a anaerobic crevice environment, you don’t get the corrosion. Most of the pits were only about a millimeter deep, and were easily removed. But on the S1 chain plate, the pit turned into a crack. Fortunately, most likely due to the stresses resulting from the rod extrusion manufacturing process, the radial pit turned into a longitudinal crack about a millimeter below the surface. That meant we could grind out a surface area to remove it, rather then drilling deep into the cross-section of the rod. which would have severely weakened the chain plate. But it definitely showed just how scary this crevice corrosion can be. The surface really didn’t look that bad – you can see how tiny the pits where in the picture. But underneath can be another story.
After polishing the surfaces that we ground so they again have a mirror finish, we prep’ed for rebedding them again. To do this, we masked the adhesion area of the welded plate, sprayed the rest of the rod with Boe-sheild as a corrosion protector, and then cleaned everything up with a xylene based solvent and alchohol in prep for rebedding the chain plates in position. We chose to use Sikaflex 291 as the bedding adhesive because its good material and cures fast even in our 50 degree weather. All went pretty well with the rebedding. We tightened the nuts until we had a good amount, but not all, of the adhesive squishing out from the plate, and then let it cure for a day. We later came back and gave the nuts another quarter turn.
So – 3 chain plates down, only 9 more to go. Next we plan to do the port and starboard main uppers, because they’re important shrouds and the chain plates are relatively easily accessible from below. After that, only the two starboard mizzen chain plates are somewhat accessible below deck (in our propane locker). Unfortunately, access to the remaining 5 chain plates is buried behind fancy woodwork in the main and aft cabin. So to access them, we are going to have to figure out how to least destructively burrow behind that nicely revarnished wood. We’re saving that adventure for later. We would love some guidance from other Nic 38 owners if you’ve figured out how to dismantle the refrigerator port cabinet area.
A note for anyone else who might be doing this – the threading on the rods is something odd by American standards. We tried to buy some NPT threaded nuts, but nothing fits. The closest appears to be 3/8″, but neither 16 nor 24 pitch works. The M10 1.25 was a little sloppy, so we don’t think its metric either. So we are guessing that they must be British Standard threads, which has a different thread angle than the US standard NPT. If there are any Nic 38 owners out there who can shed light on this thread issue, please add a comment.
We would also love to know if anyone has had to replace their chain plates. We figure if that’s required, we’re going to have to spec each one individually and get them custom made. Brion Toss mentioned another good idea during his talk – use titanium rather than stainless steel for chain plates because it does not suffer from this horrible crevice corrosion problem. And it also happens to be very high on the galvanic scale, so it seems like a very cool material for marine environment, and Brion claims its affordable now too.
-
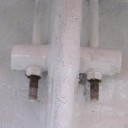
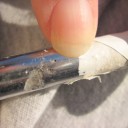
- This is how the chain plate looks below deck. You can see the stud that ‘pierces’ the knee, and the nuts that hold the chain plate rods.
-
- Port side main forward lower shroud chain plate, showing not very bad looking pit corrosion
-
- Port side main foward lower shroud damage
-
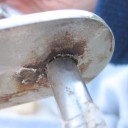
- Starboard main aft lower shroud chain plate, showing the surface corrosion that was visible as pulled. When this was cleaned up, there were only a few small pits visible, which were easily ground away.
-
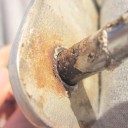
- Starboard side main forward lower shroud, showing surface corrosion before clean-up
-
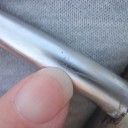
- Starboard main foward lower shroud chain plate pit damage is visible after the surface corrosion has been scrapped off
-
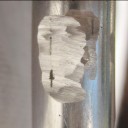
- How a pit can turn into a crack that propagates further than you think. Fortunately, in the case of the starboard main forward lower shroud chain plate, the crack propagation is along the length of the rod.
April 17th, 2010at 12:11 pm(#)
Addendum to my earlier comments: George, an owner of Nic 38 Hull #124, confirmed that the threaded rod is BSF threads. I purchase 3/8″ and 1/2″ BSF 304 SS nuts from Stig’s Fasteners in the UK. They fit nicely.
June 17th, 2010at 1:46 am(#)
I’m currently discussing the replacement of the chain plates on my Trintella 4. I wanted to replace them after I completely snapped of one of the “legs” when tightening the bolt below deck. These chain plates are basically the same as the ones mentioned in your story. As you mentioned in your story, replacing the exact same plates is very costly so I decided to go for a new design. Welding together two plates and using either a bolt or welding a threaded rod. This saves a lot as it is much less welding work. I would be interested in discussing my idea as there might be better solutions.