Portlight Problems and Solutions
August 4th, 2017 | by Marilyn | Published in Maintenance and Repairs, Upgrades
Our boat has 10 portlights, 5 on each side of the cabin. We learned on our recent passage to Hawaii that they are leaking. There are multiple reasons why.
One likely cause for leakage is the through-bolts. These were aluminum posts and stainless steel screws. Of course dissimilar metal corrosion means the the aluminum posts turned to corrosion dust as they sacrificed themselves to the stainless steel fasteners. The result is water can leak in around the fastener holes.
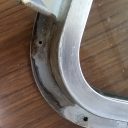
Pulling off foam stripping, and poultice corrosion where the stripping failed.
The next cause is failure of the original sealant, which was a foam weather stripping. This is especially true around the failed fasteners, which allows salt water to eat away at the aluminum causing poultice corrosion and more leakage paths.
The final cause is failed glazing compound, which is especially true on the larger glass area portlights, probably due to thermal expansion.
Another thing we learned since moving our boat to a warmer climate is that we need more ventilation in the cabin! So some failed portlights should be replaced with opening ones.
Solution 1: Rebed the fixed portlight, provided the glazing is good
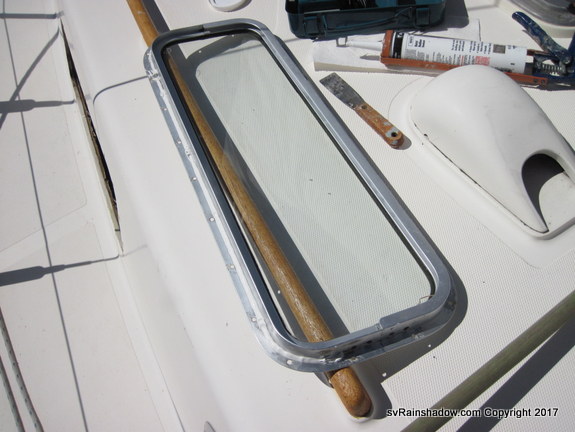
We decided several of the portlights were in good enough shape that we should clean them up an rebed them (which is a very labor intensive slow process). Despite the aluminum corrosion present on all frames, we merely used a wire brush to clean as best we could and then rebedded the frames using rubber butyl caulk. We did not do any chemical treatments to the corroded aluminum. Time will tell if this was a bad idea.

Portlight removed
For most portlights, we used aluminum light-duty binding barrels and screws available from McMaster Carr. These have the disadvantage that the aluminum slotted screw head is soft and easily stripped. It’s also important to get the correct length screw to have an appropriate number of threads engaged. We found that assuming a material thickness of 7/8” to 1 1/8” gave the best results (item 93121A342). This aluminum is not anodized, so salt water will corrode it over time.
While rebedding the last portlight (port side aft-most, which is split between aft head and aft cabin), we noticed the portlights were simpled screwed into the fiberglass in the head areas (that is, starboard side #2 and part of port side #5) without using a through-bolt approach. After 40+ years, the result is there is very little corrosion of the aluminum frames at these screw holes because there no dissimilar metal corrosion problem that caused leaking. Though we were replacing with aluminum posts and studs so the dissimilar metal problem was eliminated, our non-anodized aluminum fasteners will fail to corrosion so why expose the interior to this through-bolt leak path if not necessary? We decided to epoxy closed the existing through-holes and just use S.S machine screws to hold the portlight to the cabin side. On the interior, we plan to make a beautiful wood frame, rather than reuse the original corroded and ugly interior aluminum trim. We wish we would have done this on all portlights we rebedded, as it is not only more attractive but also less likely to leak.
Update: The aft most portlight on port side that we held in place with machine screws leaked. We discovered the cause was a failed sealant at the aft end. The problem is the cabin side is curved and the portlight is flat creating a variable width sealant layer. We decided to rebed using butyl tape, rather than butyl caulk as we had used in the first place. With the butyl tape, we were worried about the force on the machine screws being too much. So when we rebedded the portlight, we decided to thru-bolt it with #8 SS bolts/nuts for a must stronger attachment. The custom wood frame will be designed to hide the inside nut. When applying the butyl tape to the portlight frame before installing , we applied extra thick build up on the fore and aft ends. We started fastening in the center, then worked our way outwards, flexing the portlight as much as possible and relying on the thicker butyl at edges to fill the thin gaps created by the curved cabin sides, and tightening the fasteners until butyl squeezed out. We let the butyl flow under this pressure for a few days, then retightened to the final force. This worked much better. When those portlights with their non-anodized aluminum sex binding barrels and bolts need rebedding, we are going to do the same thru-bolt approach and make customized interior decorative wood frames.
Solution 2: Reglaze before rebedding
The larger portlights in position # 4 and #5 had failed glazing, as evidenced by water leaking between the glass and frame. With much trepidation, we decided to grind off the corroded screw heads that secured the two frame pieces together and then use an oscillating tool to cut the glazing away from the glass. Using the correct technique got the glass out without scratches (while the wrong technique meant scratched glass).
Once all pieced were cleaned, we reglazed using Dow 795. We made a jig to hold the two frame pieces together while the Dow 795 set up, rather than using the original approach with the screws and spacer piece. The problem with the jig approach is that it had to be removed before the window could be rebedded, and the Dow 795 can have 50% elongation – meaning the frame can misshape when reinserting the portlight into the opening. Some care in handling solved that problem, and the reglazed windows are now rebedded and water-tight.
Solution 3: Buy new portlights
Other Nicholson38.org forum members mentioned Seaglaze in the UK as a custom portlight supplier who would make new fixed portlights. I contacted them via email, and indeed, they have drawings of portlights supplied for other Nicholson 38 boats and could make us new fixed portlights using their Series 1 or 2 frames. Prices per portlight were reasonable, but when you need 10 new portlights, the final cost was high. We decided to reuse most our fixed portlights.
We wanted to replace certain portlights with opening versions to improve ventilation. We decided the portlights in the forward head (starboard side #2), the galley (port side #4) and the aft cabin (starboard side #5) were the minimum set of those that needed to be opening.
I did a thorough search for stock size opening portlights that would fit our openings, and found nothing. None of the Nicholson 38 portlights are rectangular, and every stock portlight is. In fact, every custom-supplier of portlights makes only rectangular or round portlights, so any opening portlight would require modifying our openings.
I decided the most reasonable custom suppliers were Hood Yachts and New Found Metals. I asked for quotes from both.
It turns out that Hood Yachts and Pompanette are the same company and their custom portlights are supplied by Manship. The Manship website has a catalog with the best information about how the portlights are constructed and the custom options available. But it seems Manship is in the business of supplying boat builders rather than DIY boat owners and their documentation stinks. While the Pompanette rep was eager to serve my needs, I was not comfortable with spending about US$1000 on a portlight that I was not sure how it was made.
The custom quote from New Found Metals (NFM) for portlight #4 and #5 was about $1300 and $1100 respectively. We quickly decided that doing some fiberglassing and buying stock window sizes was more affordable.
In the end, we purchase for portlight #2 (head) the NFM stock size 615, for portlight #4 (galley) the stock size 822 and for portlight #5 (aft cabin) the stock size 726. Invoiced prices were cheaper than those listed online by about $100 per window. We also bought chrome screens for each portlight.
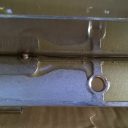
Tack weld of spigot to frame, and the epoxy used elsewhere.
On inspection of the as-delivered NFM portlights, we were not overly impressed with the quality of manufacture. Each window appears to be unique, so their manufacturing processes are very hands-on (and therefore somewhat random). The spigot is only tack-welded to the window frame and in other areas an epoxy is used to seal this important joint. The threaded posts had rough-cut threads with thread shards still present. On a positive note, the units are certainly heavy and the glass is very clear. We have friends who have had these installed for years and love them.
One issue to consider with the NFM portlights is that they are stainless steel and so not flexible. The Nicholson 38 cabin sides are slightly curved, so we had a problem. Our solution was to make a custom wood spacer for the interior that allowed the interior window part to mount flat. The wood spacer accommodated the curvature of the interior cabin side while the outer stainless frame flexed enough to accommodate the exterior curvature.The wood spacer also meant the 1.5” spigot only protrudes from the hull less than 1/4”.
For portlights #4 and #5, we installed them by first fiberglassing the openings to be undersized, then routing to the correct dimensions. We then determined the sizing needed for the custom wood spacer. These were time consuming tasks!
We used Bed-it Butyl from Compass Marine to bed the new portlights. It took A LOT of butyl to fill the gaps and get this window sealed properly. We did not exactly follow the NFM installation instructions, as we used only butyl and no caulk or foam tape – but we did follow the general spirit of their approach to sealing the windows in place.
After installation, the latches required adjusting to properly compress the gaskets. We didn’t realize this until after the first rain when water liberally poured inside.
*** Updated after position #2 in head installation completed in July 2018***
Installing NFM615 in the head (position #2 starboard side) went easier than the others because no glassing was required. We only had to cut the existing hole in a few places to be able to fit the window spigot through the opening. We did this using a rasp on a drill, and in a few places, and oscillating tool. We also chamfered the outer edge of all through openings. Some things we learned:
— At the head window opening, the cabin side and inner liner are glassed together . The total thickness is about 1 3/8″. Fortunately, the 1.5″ spigot on the NFM portlight is sufficient. During install, we used M6x40mm screws to hold the outer frame to the inner window part.
— Most of the resizing of the window opening was to cut half-circles for the drain ports on the NFM portlight. This exposed a foam core between the cabin side and inner liner. The foam core was also exposed by some of the countersunk screw holes. Anywhere this foam core was exposed, I liberally used 5-minute epoxy to seal it up. The foam was very crumbly, nasty stuff – like you would expect 40 year old pour-in-place open-cell foam to be.

This picture shows the cross-section of the opening after cuts exposed the foam core. You can see the outer frame of the NFM portlight laying on the deck outside the window. The cutout is where the spigot drain is located.
With the opening portlights installed, the improved ventilation is a big plus. We’ll see how we like these windows in a few years, and maybe we’ll buy more to replace portlights #3 (we would again use the 822 stock portlight, same one as we used in position #4). Portlight #1 could be replaced with stock size 317SS but it’s such a small area opening, it might not be worth the cost and hassle. But a cross breeze sure is nice.
One thing we have already noticed is that portlight #4 on the port side is directly in line with the water that drains off the coachroof and windscreen. Especially if the main is up, that is a very large catchment area, and if the portlight is opening, the water all pours into the galley. We added a miniature gutter above the opening portlights to redirect the water around the opening. This works reasonably well as long as the water flow is from rain, not a garden hose while cleaning the deck. Here’s the product: Drip rail. The manufacturer’s website only offers 250′ rolls, but other sellers offer more reasonable lengths for our use, such as 10′ or 25′ rolls.