Replacing the Cockpit Canvas
December 1st, 2022 | by Marilyn | Published in Upgrades
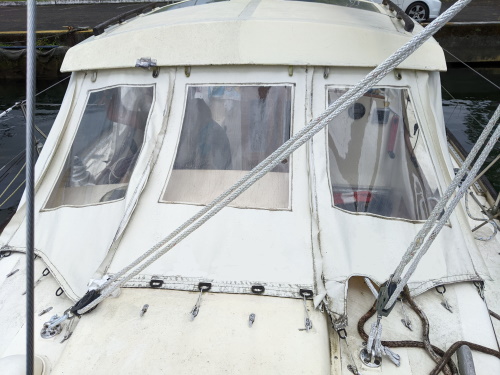
The original cockpit canvas (that is, the canvas at the time of our purchase) didn’t fit well and was starting to fail. So we decided to make some design improvements and construct a new one.
New design points were:
- proper fit, goal of keeping rainwater out best possible, including flaps over zippers.
- support poles inside the canvas from roof downward, so rainwater couldn’t run down poles and into cockpit.
- gussets at winch openings so sheets can enter cockpit, but rainwater does not.
- three aft windows port, center and starboard.
- zippers on both sides of all windows, so each window panel can be rolled up separately.
- separating zippers at posts, so (e.g.) port size could be removed for repairs without removing all canvas panels,
I bought the materials at Sailrite, the ever-helpful canvas fabric store, and used their Ultrafeed machine to sew it. I chose the following materials:
- — Canvas fabric: Weblon Regatta® Ivory 62″ Vinyl Fabric – this is tough stuff with a nice hand for canvas. Does not need edge finishing. Good dimensional stability. An alternative would be the Shelter-Rite® fabric, but it is much stiffer – perhaps it’s best used for chafe protection. (First I bought Herculite Riviera, but it was too soft to endure being a tough canvas.)
- — Windows: Regalite® 30 Gauge Vinyl Window Material 29″ x 68″ Clear – I got 2 pcs of this, which was enough for 4 side windows (2 each side) and 3 aft windows. This material rolls up nicely.
- — Upper track: Flex-A-Rail White 44″ Long – upper track attached to cockpit hard top. This was how our old canvas was attached, and some need replacing. Also got the special fasteners so boltrope clears.
- — Boltrope: Keder Awning Rope White 5/16″ – boltrope to run through the upper track.
- — Zippers: YKK® Zipper #10 White with Double Pull (Vislon). I bought both continuous chain for making my own zippers at most opening points, and two opening zippers for at the posts.
- — Securing points: Loxx® Pull It Up Fastener Cloth-to-Surface Oval Plate Stud Set (Nickel) – we used opening zippers just forward of the metal support post so we can remove sides separate from aft. We used the Loxx fastener to keep tension above support posts and take pressure off the opening zipper. The stud is screwed to the hard top, the fastener attached to the canvas via a tab.
- — Webbing: Tubular Polyester 1″ White 2700# – sewn at canvas bottom as a strengthener for the D-rings, see next note. Also used to create tabs for Loxx fasteners describe above.
- — Tie down points: D-Ring Sewable Nylon 1″ Black – used about 40 of these to make canvas lower tie-down points.
- — Sewing aids: Seamstick 3/8″ Basting Tape for Canvas – to hold things together before sewing. Vinyl canvas is not forgiving when seams must be torn out (it leaves a bunch of needle holes in your “waterproof” fabric), so it’s vital your goal is to stitch once in the right place.
- — Waterproofing: Seams can be sealed with HH-66 Vinyl Cement – but I do not recommend this. The cement coating goes mildewy very quick, so all our seams are black and ugly, while the canvas looks great after a couple years in the tropical sun.
I made rough patterns and measurements from the original canvas, modified them according to our goals, and then sewed it together in a logical sequence so I could check eat fit and make alterations as needed before the whole unit was completed. It took a lot of trips to the boat with partial assemblies, but in the end, I am happy with the fit. I made it several years ago, and other than the bad choice of using the Vinyl Cement to seal the seams, it’s holding up well. I don’t think I would change any of the design.
Note, we did have to make drip edges under the coach roof at the post area to avoid rainwater wicking inside. The drip edge was easily made with a bit of butyl tape, which is like puddy, stuck to the underside of the coach roof in the right spot to get the drip to land outside the canvas.