Replacing the Engine Mounts
June 22nd, 2012 | by Marilyn | Published in Maintenance and Repairs | 6 Comments
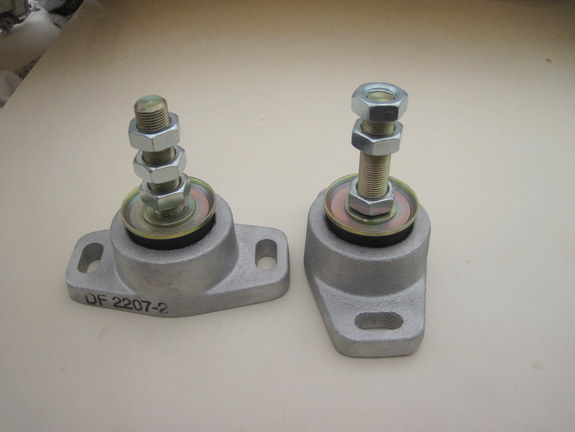
If you need to replace the engine mounts on your Perkins 4-108, here’s the simple answer: use Bushings Inc. DF 2207-2 mounts. Now, it was a lot of work to figure this out, so I am going to give the long answer too.
To know which mounts to purchase as replacements, you need to know the following dimensions:
– the separation between the bolts that hold the mount to the engine bed. We measured 4 inches.
– the diameter of the stud on the engine mount – we measured 5/8″ inch
– the weight of the engine plus gearbox. The Perkins manual says that with a hydraulic gearbox (which the TMP12000 is), the engine + gearbox is 570 lbs.
– the clearance between the engine bed and engine bracket when the shaft is properly aligned. To approximate this, we measured this distance with the current ancient, decrepit mounts, and got 2.25” (with the aft starboard mount at 2”). This is the measurement that caused the problems because most modern snazzy mounts that meet all other criteria have a minimum clearance of 2.75” or more. Our dilemma was – we knew the engine was badly misaligned with the shaft (it was too low, but horizontal alignment was good), and we know the Nic 38 has those amazing flexible couplers, so could we get away with using something snazzy that has a higher minimum clearance?
(A little aside about those Nic 38 flexible couplers – after much internet searching, I discovered they are Silentbloc couplers, and you reportedly can still buy replacement parts from Thamesway Marine. The sides of the rubber bushings will have a number marked on them, and you’ll need that to get the correct parts. But those replacement parts might cost as much as a new modern “flexible” coupler. The benefit of the newer “flexible” couplers is that they are designed to fail before your expensive gearbox is damaged by, for example something wrapped around the prop, while the Silentbloc will gladly hold on until your gearbox is trashed. Newer “flexible” couplers are about vibration isolation, they do not mean you can have bad engine:shaft alignment. The R&D Marine rep told me their “flexible” coupler requires alignment accuracy to 0.010”. The SilentBloc couplers allow your alignment to be WAY out, maybe as much as an inch!)
Eventually, we decided the prudent thing to do was to buy engine mounts that would allow us to have accurate engine alignment so that there is less wear on everything, and in the event our Silentbloc couplers rust away or otherwise fail, we can swap to a modern flexible coupler and not have to change our engine mounts at the same time.
Here’s the engine mounts we considered:
– Barr 80001 was used on some Perkins 4-108 installations, and it is still available for an amazingly low $20 each. These have a minimum clearance of 2.6875”. I deemed these too high of clearance, and too cheap for quality.
– R&D Marine sells “Supermount” 800-010. Cost ~$85 each. The helpful R&D Marine rep said the 800-010 is their only mount that is suitable for the Perkins 4-108. Minimum clearance – 3.05” if you use the 0.55” adjusting nut supplied with the mount. The rep said we could use a half nut (thickness 0.375”) or no nut and instead use shims for alignment. This was my favorite choice because of the failsafe design that survives rollover tests,and the price for a quality mount – but I was not willing to take the risk of having the minimum clearance be so far from our current measurement.
– Polyflex of Australia is distributed by Thermoboat in North America and that rep told me with the Perkins 4-108, he would not warranty any installation unless it used the P4.5CTF60-15-16. Cost $150 each. OUCH! And the minimum clearance is about 2.8”. No good.
– Globe makes some funky rubber mounts that require wedges for alignment. The cost was high, more than $100 each – I forget the details. They seemed too “out-of-the-box” to me, and the bolt pattern was slightly off 4” centers.
– Vetus doesn’t make any mounts with a 4” center.
– That leaves the Bushings Inc DF2207-2 mounts. Minimum clearance 2.375” – that’s much closer to our current 2.25″ measurement – good! Cost about $43 each. They make no claims of a failsafe design, so I really wanted to try something better – but I could find nothing else with this low of clearance that met all the other specs. I called for advice from the local Perkins experts – Stewarts Marine in Seattle – and the parts expert gruffly told me – use the Bushings mounts. That’s it then, we’ll use them. They were in stock locally anyway.
Now – weeks passed before I got to that decision. I hope others find this useful (or maybe we’ll find it useful in 10 years when it’s time to replace the mounts again.)
Replacing the mounts turned out to be MUCH simpler than we thought, so Van did it himself in about 8 hours. I’m sure a professional mechanic with better tools could do it faster, but we got luck so we can keep our boat-buck for something else. Here’s the tricks for the DIYer:
– Both the aft and front mounts are attached to brackets that are attached to the engine. Remove the bolts that hold those brackets to the engine, unbolt the mounts from the engine bed, and get the bracket plus mount out as an assembly. This means you don’t have to jack the engine up a few inches to clear the mount stud, so you don’t have to disconnect anything like the exhaust or prop shaft. This is a huge time saving, and avoids the likely trickledown effect that happens whenever you start mucking with stuff.
– Support one end of the engine and remove one mount at a time. Van did this by putting a robust weight lifting bar spanning the two cabin companion ways, with truckers ratcheting straps to pull the engine up just a 1/4” or so. Check the load limit on these straps– he used 2 for redundancy. He hoisted the engine just enough to take the force off those brackets. Do not hoist too far if when using these ratcheting straps – there is no way to let the engine down gently. You just have to release the strap and *bang* down she goes.
– The absolute hardest part of the job was getting to the nuts under the engine bed on the aft starboard mount. It’s pretty tight back there in the Nic 38 engine room, and you can only get at it from the top. Getting these 2 nuts off took more time than anything (a couple hours). They were not seized –thankfully Camper & Nicholsons used quality fasteners and anti-seize, so all fasteners came off with reasonable force – once Van could get his arm into position. He was so glad that C&N didn’t use cheap steel that had rusted stuck in the 38 years since these have been touched. All fasteners looked great, and he re-used them all!
– The only nut that was rusted in place was on the engine mount stud, but since it’s possible to remove the engine mount and bracket as an assembly, he could cut off this stud without having to do boat yoga at the same time.
– Van did notice that the engine bed fiberglass has had a indent in that is the shape of the previous mount’s footprint, presumably from the original mounts vibrating in place for 38 years. This meant the new mounts went back into the same rotational position.
Once the new mounts were installed with the adjustment nuts all the way down the stud, amazingly no alignment fiddling was required. The as-installed minimum clearance was spot on! So –the correct clearance was about 2.375”, and the Stewarts Marine parts expert was right – just use the Bushings mounts.
We took the boat out for a short trial, and the vibration is much less. HURRAH!!
A word about how we measured alignment – just how do you do that when you have such flexible couplers? Clever Van built himself a simple laser pointer holder jig that could be attached to the stuffing box side of the aft coupler, and point at the coupler at the gearbox (or vice versa). When he rotated the shaft by hand, if the couplers accommodated any misalignment, the laser dot would not stay pointing at the same position on the other coupler face. Some pictures below show this jig, and the dot.
And finally, we were warned by another sailor – tighten the lock nuts down very tight so the adjustment nuts do not back down due to vibration. On his boat, he tried to turn the prop by hand one day, and discovered he could not. With some sleuthing, he figured out that the alignment nuts had backed off, and the engine weight no longer supported by the mounts – it was being supported by the shaft, exhaust manifold, whatever else connects to the engine is not flexible enough to accomodate very bad misalignment. YIKES!
A note about how to view photos in the gallery below – if you can only see the photo title and not the description, click the I button to toggle the description field open and closed.
-
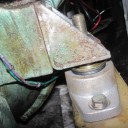
- Here is the new engine mount on the aft bracket. Looks much nicer than the old rusty ones.
-
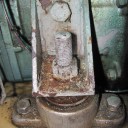
- The aft mount is held to the engine with this bracket. You can remove the two bracket screws (one is hidden in the photo), and the screws from the engine bed to get off the mount and bracket as one assembly.
-
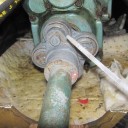
- See the red laser dot on the shaft coipler (right side at 3 O’Clock) As the shaft rotates, this dot should stay in the same spot on the coupler if there is good alignment. If it wobbles about with shaft rotation, then the alignment is bad.
-

- Here is the alignment tool that Van fashoned. It sits on the outside of one coupler and points at the inside of the other coupler. If the two couplers are properly aligned, the laser dot will not move with shaft rotation.
May 13th, 2014at 8:18 am(#)
Thank you sooo much for the great information. I am in the process of accumulating the info needed to replace the mounts on my 4-108. I have a Topper Hermanson 36 custom steel cutter. My engine beds are steel and thank GOD fairly accessible. I have been told that normally you should align the engine when the boat is in the water, but with steel boats in does not matter. Any thoughts? I think the Laser idea is genius.
Thanks again for the info,
S/V Golden Echo
July 1st, 2015at 3:55 am(#)
got those and I don’t think they are strong enough
January 12th, 2016at 9:55 am(#)
We’ve had these mounts on for several years now, and we are happy with the performance. We’ve been motoring in some rather rough conditions, where the mounts would have been highly stressed, yet all seems well. In addition, our local Perkins guru recommended them, and they’re not the kind of shop that needs to “make” business for themselves by giving advice that will result in more repairs later.
November 1st, 2015at 12:06 am(#)
About to replace the mounts on our perkins 4108 engined Oyster 406 so this was very useful – many thanks
December 16th, 2016at 1:43 am(#)
Thank you very much for this great article!
I am doing and overhaul of my 4.108 with the gearbox Hurth HBW150-2R in Mariner 38 PilotHouse. The original mounts were DF-205, as they are not in the produce any more I think DF 2207-2 might replace them well. It is quite a time you wrote this article, might I ask you how are you satisfied with your choice of mounts after some time?
December 20th, 2016at 9:51 pm(#)
We are happy with our engine mounts – one of those things that are out of sight, out of mind. I wish we would have painted them before installing, though, as they are going rusty.