Overwinter 2011-12 Improvements
June 20th, 2012 | by Marilyn | Published in Maintenance and Repairs
Rainshadow overwintered at her slip at the Port of Poulsbo. It’s a good slip, but we were spoiled rotten having our boat only a 1/2 mile walk away prior to this – now it’s a 35 minute drive each way. Anyway, it didn’t stop us from making a lot of improvements this winter/spring. Here’s the list:
- Redo the DC electric system. New Blue Sea Systems panel and fuses, lots of improved wiring to ABYC standards and other improvements, such as a shunt-style ammeter – now we have much less fire risk. Van does an excellent job on wiring. (He redid the alternator charging system last summer when we replaced the T-105 batteries.)
- Van also added some important switches at the helm for me. For example, I can now turn on/off the windlass and Neco autopilot without leaving the helm. Last year he replaced the battery switches too – so there is very little climbing in/out cabin required anymore. This is a nice luxury for me!
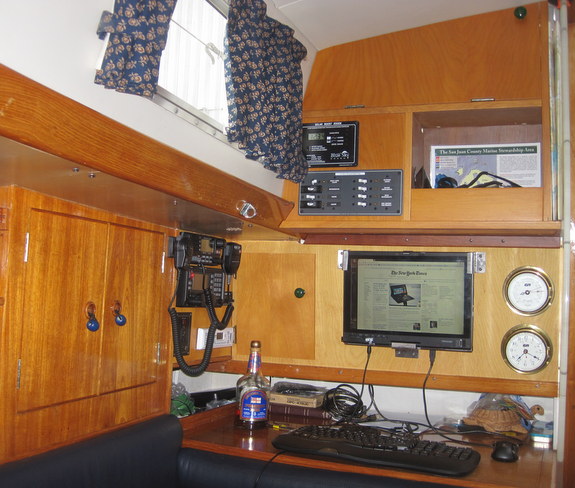
- While redoing the electrics, Van took the time to redo the entire Nav station cabinetry (see photo above). We now have better storage, a computer station, as well as conveniently mounted electrical switches and very nice LED under cabinet lighting. He also mounted his new (to us) ICOM M802 SSB, and made the starboard shroud into the antenna by adding an insulator. He’s always on the quest for better SSB operation.
- Van replaced the upper shrouds and backstay (the forestay was replaced when we installed the roller furler in 2010). While at it, we replaced the turnbuckles. We reused the two Staloks that were on the shroud bases, and added Hi-Mods everywhere else. (The new SSB antenna insulator is a Stalok.) Van discovered the tangs expect 7/16” pins, while rigging for 9/32” is only designed for 1/2” pins nowadays. We kept with 7/16” pins because he didn’t want to try to ream out the tangs without taking down the mast. We’ll do that job another year.
- Van rebuilt the boom outhaul. There is a separate posting about that here.
- Van replaced the engine mounts. This was such a big job, it deserves its own posting.
- Van got new solar panels to replace the 25+ year old panels that came with the boat. He’s not quite finished the installation, so I cannot report much yet. But to put in these new panels, he had to move the outboard motor mount (he replaced it with a nice aluminum one that hangs on the pushpit) and he got rid of the secondary fluke-style anchor that he hated because it ate mizzen sheets. We now have a Fortress FX-23 that we can stow below. Oh – and we also got a new stern line holder mounted on the pushpit. It’s pretty busy back there now. We plan to try out the Monitor Windvane this summer too…
- I got a windscreen wiper! I chose a AFI-500 motor (OEM model that is now discontinued) with a 10-14” adjustable arm and a 14” wiper blade. I hate looking through raindrops.
- We insulated the V-berth and main cabin. I chose a NBR/PVC sheet insulation product, similar to Armaflex – actually it 3/4” “gymnastics mat” from FoamFactory.com. It’s closed cell with great insulation properties at 1/2 the price of Armaflex. We stuck it to the hull with 3M-77 spray adhesive. (We also used some 3M-78 on some pink foam sheets in some areas.)
- I made new V-berth cushions using Dri-fast foam (60 ILD) and a 1” Talalay latex foam topper. The covers are made from Krypton fabric on top, and Phifertex vinyl mesh on the bottom. Our goal is to get better ventilation to the cushions so our bed does not get so soggy during fall cruising, so we choice the Dri-fast outdoor foam and bottom mesh. We slept on this one night, and though we like a firm bed, this was a but more like sleeping on cement. So we’re figuring out how to make it softer by making the topper thicker.
- I spent countless hours removing all the varnish from the teak handrails and toe rails. I then thoroughly cleaned them, and applied a product called TeakGuard from All Products. This is an acrylic penetrant that they guarantee not to chip, fade or peel for one year. To renew it, I simply have to wash with soap and water, and apply another coat (which is so simple, not at all finicky like varnish.) It’s a matte finish, which is what I wanted, and it semi-transparent so the grain shows through nicely. I like it so far. It makes such a huge difference in the “dock-appeal” when the boat’s teak has that lovely golden shade. We’ll see how it holds up. I hated the varnish that was peeling.
- I also removed the gloss varnish from the lazerette seats because they were dangerously slick when wet. I made my own non-skid by sprinkling a very fine grained white sand onto the new wet varnish. I then coated it with 2 more matte varnish coats, which made the sand essentially visually disappear but left a nice rough surface. Now no one should break their leg climbing into the cockpit. While at this sort of work, I also rounded all the sharp wood edges of the cabinet trim and door moldings. We both have had enough bloody knuckles and foreheads from scrapping against these the sharp edges –it was time for drastic action such.
- Van’s carpentry effort extended to rebuilding the aft-deck locker lid (which had cheesy hinges that failed), and making an improved divider between the v-berths and chain locker.
- Van replaced the deck-level running lights with an LED bi-color last summer. This winter, he cut off the big plates that held the old lights (and snagged sheets) and added a protector bar so his new bi-color doesn’t get pulled off by a spinnaker jibe.
- I’m making a dinghy cover that can stay on while underway so we don’t have to bail rainwater from the dinghy. It’s not quite done yet. Maybe I’ll add a photo of that when I am done.
- Oddly – we discovered our failed water tank repair with Sanitred has almost stopped leaching oil (after 2 years) – which means the sides no longer feel slimy and when we added water, we cannot see any oil floating on the surface. The water does still pick up the Sanitred smell onces it been in there for a while, but we decided to replaced the cut-out top, and are using the fiberglass tank again. You can read more about this very lengthy saga here.
It’s well past time to break out of “repair mode” and move into “cruising mode”. We turned in our notice to vacate our Poulsbo slip by June 30th. Nothing like having a homeless boat to get us out on the water for the summer.