Cleaning the Heat Exchanger
April 5th, 2010 | by Marilyn | Published in Maintenance and Repairs | 1 Comment
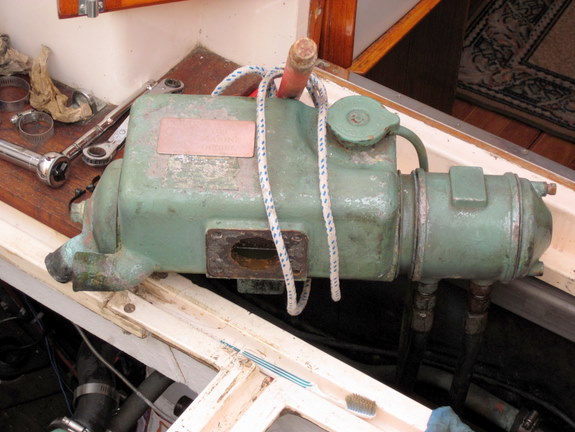
Rainshadow’s Perkins 4-108 diesel engine uses sea water (otherwise known as ‘raw water’) to cool the lube oil and engine coolant in a two-part heat exchanger. General lore is that you’re supposed to periodically remove the heat exchanger and clean the tubes that carry the sea water through the housings. Rainshadow’s heat exchanger had never been cleaned in all her long 35 years. So we decided to give it a go (mostly on the surveyor’s recommendation as he said there was too much corrosion around the sea water drain plug a.k.a. pencil zinc).
To make a 3 week saga short (for those of you who just like to look at pictures) I can say that cleaning the heat exchanger was probably a good idea, but maybe we should have just left well enough alone. The engine was running at a good temperature, we were not losing any coolant, and there was no mixing of sea water, coolant, and/or oil. When we took the heat exchanger apart, it was dirty and had some calcium build-up, but probably 90% of the tubes were running completely clear. Cannot explain why ours was so good after so long, while you can read others saying their tubes are almost completely clogged.
The biggest concern turned out to be the pits in the O-ring seal area of the aluminum header tank. By disassembling the tank and removing all the calcium build-up, we exposed those pits making it hard to get the unit resealed. I suppose you could argue it was good to clean out the corrosion, as we did on the chain plates (see an earlier post), but we didn’t do anything to get to the bottom of these pits. We just filled them in with J-B Weld in hopes that we could smooth out the surface well enough to get the O-rings to seal. The big difference is that this tank just holds some 7 psi coolant inside, in contrast to the chain plates that hold up our rig.
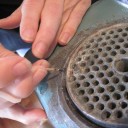
We removed the heat exchanger, and did all the cleaning ourselves. We had Mark, a mechanic at Flying Wrench, come out to re-install it because we didn’t have the tools and strength needed to get the housing off to change the thermostat. That’s not a non sequitur. The first step in changing the thermostat is to remove the heat exchanger, so it made since to do it while it was off. No telling how long that thermostat had been on the engine, but I can say the nuts were still painted down. (The previous owner had repainted the engine at some point in the distant past.)
I am delighted to say that the heat exchanger is back in, the engine starts, and its running at a nice temperature – just like it was before this whole adventure started. But we sure learned a lot about working on diesel engines. Its the first time we’ve done that (though both of us have worked on car engines a fair amount in our past lives.)
In case there are curious owners of Perkins 4-108 diesels of the UK variety that have the heat exchanger bolted to the front of the engine block, I’ll explain the fairly straight forward process:
1) Drain the coolant from the header tank via the drain plug on the bottom. It dumps almost a gallon of coolant.
2) Remove all the water hoses, both coolant and raw water. More water dumps out that really shouldn’t just dump into the bilge.
3) Remove the oil hoses. This was hard, as they were quite inaccessible hanging there under the heat exchanger, and the fittings were tight! We actually failed to complete this step before moving on, but we eventually got them removed once the whole unit was unbolted from the engine block. Very little oil drained out once removed because we’d not run the engine in a while.
4) In theory, you can leave the header tank bolted to the block, and extract the tie rod to disassemble the parts. In practice, there was not enough room for that, so we carefully supported the whole unit by supporting a stick above it and attaching a rope around the unit so it wouldn’t fall when we removed the bolts that hold the heat exchanger to the engine block thermostat housing.
5) Carefully extract the heat exchanger, realizing that more fluids will dump out, so have those pans in position below either end.
6) Remove the cap nut on the header tank end. There should be a very thin copper washer that may be stuck to the header tank. So stuck that you might think there is no washer at all, but look for it. It’s almost paper thin. The manual says there should also be an asbestos washer, but we didn’t find one.
7) Extract the tie rod by pulling on the cap at the oil section end. Realize that the spacer and oil section will be free once the tie rod is removed. Also note that the tie rod is actually threaded into the oil end cap, so it might be possible to disassemble the unit with the header tank attached to the engine, but I doubt it.
8 ) At each end of the housings, there are O-rings that seal the tube stacks, housings and end caps. Dig these O-rings out. After 35 years of compression, ours looked like some exotic D-shaped ring. However, replacements are simply off-the-shelf Parker O-rings made of Viton. Get size V1000-343. (Nominal ID 3.74” x-section 0.202”), standard 70 durometer. Perkins does sell pricey replacement O-rings, but why pay 6x the cost? (Our Perkins dealer was not pleased with my attitude!)
9) In theory, you can remove the tube stacks from the housings. In practice, ours were very stuck! We did eventually get the stack removed from the oil housing, but the one in the header tank would never budge. No matter, we could still clean the inside of the tubes. I’m not convinced it’s worth trying to remove them anyway. They are a very, very close fit, and it would be very easy to get it jammed part way through if they became misaligned, and then you’d be in a real pickle.
10) Clean the parts in a white vinegar bath that’s been heated to almost boiling. Our Perkins dealer told us that caustic cleaning is too hard on tube stacks that are soldered rather than welded. Cleaning in vinegar is also something you can easily do yourself. We ended up soaking them in a series of vinegar baths, changing the vinegar when it had been ‘neutralized’ by the calcium. We eventually used about 4 gallons of vinegar. Be sure to soak the oil and coolant housings separately so you don’t contaminate the header tank with oil. We also used a bamboo skewer to push big chunks out of the tubes, running the skewer through the tubes in the opposite direction of the sea water flow when in operation. The tubes are delicate copper, so be careful how you run things down them.
11) Anneal the copper washer that you should have found at the nut end of the tie rod. Just use a torch to heat it to a dull red glow, and then if you want, toss it in a water bucket to quench it. In practical terms, the rate of cooling doesn’t matter as you’ll keep the same crystal structure with air or water cooling. The annealing is to relieve the work hardening caused by dislocations, so the copper washer becomes soft and pliable again.
12) Carefully inspect the O-ring seats in both housings and in the spacer. We had lots of tenacious calcium deposits that would not come off in the vinegar. We eventually used a copper wire wheel on our Dremel tool to scour them off. The O-ring seats must be smooth, and not pitted. We patched the pits with J-B Weld, and then sanded them smooth using 400 grit wet sanding paper. Ideally we would have ground out the pits, welded material in to build back up, and then machined down to a smooth surface. But without getting the tube stack out, that was just not possible.
13) Lucky step thirteen – re-assemble the unit. Insert the tube stacks if you got them out, put the O-rings around the tube stacks, slide the tie-rod through from the oil housing end, ensuring the spacer is in place, put on the copper washer, and finally tighten the cap nut to 25 ft-lbs (according to the Perkins manual). On the oil housing end cap, there is a drain plug for the raw water. We stuffed in a pencil zinc, which could only be 3/4” of zinc before it collided with the tube stack. There is some debate about whether this heat exchanger needs a zinc because the O-rings are supposed to keep the aluminum and copper dissimilar metals isolated. However, we decided salt water is conductive, so galvanic corrosion was possible despite the physical separation – witness the pitted aluminum. Besides, the previous owner had been putting in pencil zincs for many, many years, without any harm associated with them breaking off and blocking important bits downstream.
14) You probably want to change the thermostat on the engine block before remounting the heat exchanger. Its under the housing that the heat exchanger bolts to. On our Perkins, it’s a good trick to get off that housing, as it has an encapsulated nut. Nasty! Glad the mechanic was doing it.
15) Bolt the heater exchanger back on, hook up all the water hoses and oil hoses, and pressure test the dry system – if you have one of those cool pressure testers that screws on in place of the header tank cap. Our cap said it should hold 7 lbs.
16) Refill the header tank with coolant. You’re done. If you didn’t drain all the coolant from the engine block, there is not even any worry about air in the coolant system so there is no need to ‘burp’ the block.
-
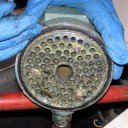
- The dirty tube stack before cleaning. It’s odd that it looks like there is even some green plant material in there. I think we best check our raw water strainer to make sure its doing its job properly.
-
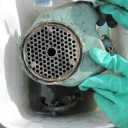
- One end of the tube stack after being cleaned in hot white vinegar. It worked great. You could even hear it sizzling and watch it bubble when there was still lots of calcium build-up.
-
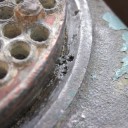
- These were the worst pits in the aluminum header tank housing. There were about 7 areas, only in the header tank, that needed repairing.
-
- We gooped up the pits with J-B Weld. The perfect solution to most problems – just goop it up!
September 18th, 2013at 6:05 am(#)
Thanks, the pictures of the Heat Exchanger and your description of the process is very helpful. However, it probable convinces me to get a mechanic to do the work if we go down that route.
Thanks again
Tom