Cleaning the Fuel Tank and Polishing the Diesel
April 6th, 2010 | by Marilyn | Published in Maintenance and Repairs
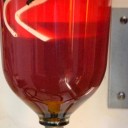
We pulled a sample of diesel from the bottom of the tank to learn about what’s going on down there. At first, the fuel looked pretty clean, but then we scraped the bottom of the tank with the sampling tube, and a bunch of gunk came up. The picture above is what settled in the glass sampling jar. The tank had never been cleaned before, so this is not too surprising. Definitely time to clean the fuel tank because diesels don’t run well on gunk.
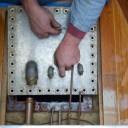
Fortunately, the fiberglass tank has a nice metal access plate which is designed to be removed. That is, if you have the patience to remove the 40 (!!) nuts that hold the plate down. It was also a pretty good trick to get the plate pried off its gasket after the nuts were removed.
While Mark from Flying Wrench was out helping us with the heat exchanger (see previous post), we had him clean the tank and polish the fuel. In fact, most of his time was spent working on this fuel tank. During the fuel polishing, it clogged their Separ filter 3 or 4 times, so it was well worth the effort to do the cleaning.
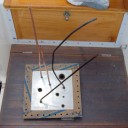
While the plate was off, we had them tap two more 3/8” copper fittings into the plate so we can add a dedicated fuel polishing loop in the future. One fitting has a 3/8” copper pipe soldered on that reaches to the lowest point of the tank (total depth seems to be about 28” at deepest point). That will be the pick-up line for the fuel polishing loop. The other fitting will be for the return of the fuel polish loop. It has a copper tube extending about 23” down so we don’t froth the diesel while polishing.
The plate originally had 5 fittings in it: fuel fill; tank vent; engine inlet; engine return; fuel gauge dip stick port hole; and unused line for a Webasto heater that was formerly on the boat. The 1.5″ fitting is for the fuel inlet from the deck fill. It does not have a tube that extends into the tank, so the diesel may become frothy during refueling. The engine fuel line picks up very close to the bottom – according to the manual its supposed to be 1″ from the bottom, but it may be closer. The engine fuel return just dumps into the tank from the cover – again no tube below the cover plate.
Flying Wrench made a custom cork gasket for resealing the lid. Notice the nice dovetailed joints at the corners in the picture below. That’s just how the original gasket looked too. In addition to the cork gasket, Mark also applied a silicone sealant to ensure good adhesion to the rough fiberglass mating surface.
Our intention for the fuel polishing loop is to use a Walbro FBR-13 diesel fuel pump, and probably a Racor 500MA 10 micron turbine fuel-water separator filter. The primary filter on the engine’s fuel line is 2 micron, so this will be a nice series of filtering. We intend to run it maybe about once a week for a few hours while at the dock, which will turn a full fuel tank about 4 times.
Hopefully, with some caution while refueling, a dedicated fuel polishing loop, and the appropriate use of some biocides, we won’t ever need to have the tank professionally cleaned again.
- Removing the access cover off the fuel tank
- Peering down into the vat of diesel in the open tank.
- The particles being separated by the fuel polishing. After all the effort we went through to get the fuel polished, I was glad to find it so dirty and therefore necessary to do this.
- The bottom side of the access cover, with the new cork gasket attached. The wild, wiggly copper tubes are 1) the long bent one is the engine fuel line, 2) the short diagonal one is the former Webasto heater fuel line, 3) and 4) are the shiny new copper lines (not yet bent into position) to be used for our dedicated fuel polishing loop.


