Boom teardown–outhaul revealed
November 7th, 2011 | by Van | Published in Maintenance and Repairs, Rigging
OK, so the sailing season is over for us, and I have started several projects, including tearing down the boom.
Trevor (Ronar M) on the Nic 38 forum described the outhaul system as “poxy” which exactly describes how it is. You have to pull very hard on a little “string” that comes out of the boom – and at the front of your mind as you are doing this, is that if it snaps – ping, overboard you go. I’d measured it as only having a 3:1 purchase. Not much.
Yesterday I took the main boom off Rainshadow, and today I tore the boom apart to get into the innards where the outhaul mechanism is. That was the first challenge – undoing all the fasteners that hold the boom ends onto the main tube. There were mostly all seriously stuck because of the corrosion between stainless and Aluminum. I used impact drivers, a torch, acids, lubricants, etc. In the end I had to grind off some and drill out the screw. Now I will have to tap some of these holes a size larger later.
Once the fasteners were out, the boom ends came out easily – the anodization was still good on the inside.
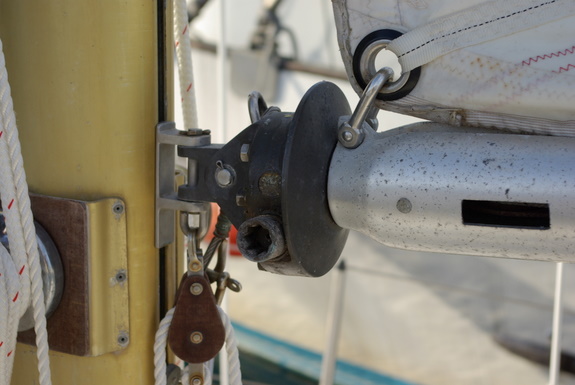
At the forward (mast) end, there is a double block held in place by an aluminum rod that passes through the boom. The ends of the rod had been hammered down so that it would not come out, sort of like a giant rivet. I had to grind off one end slightly and then bang it out. I’ll have to replace it now, perhaps with a stainless bolt.

You can see it here before I took it apart. The giant rivet runs left to right at the back behind the block. The line exits the boom at the right. The hole at the left is for access for lubricating the sheaves (that’s what I do).

At the left, shown taken apart, is the rod that holds the block in place. In the picture, the block is rotated 90 degrees relative to the rod so you can see the sleeve that fits over the rod.
Next, as you move aft, you get to another block that is connected to the end of the stainless steel cable that is connected to the slider where the clew is fixed. This block has the end of the “string” tied to its becket.

That line travels back to the double block, around the first sheave, then back to the aft block through the sheave and back to the last sheave on the double block and then out the side of the boom where its cleated off. If that’s not confusing enough, suffice to say it’s a three to one purchase.
The cable attached to the block above leads aft and around a sheave in the end piece of the boom, and then exits on top where it is attached to the slider in the groove on the top of the boom. 
This is the slider (upside down). The top part slides in the track on the top of the boom. Note the missing black plastic spacer at left. The cable is swaged to a threaded rod, which has a nut with a split pin to stop it coming off.
Other notes, the cable is about 9 feet, and the line is about 21 feet. I’m quite sure the line is not the original. The boom had obviously been disassembled before (and equally obviously was they also had trouble getting fasteners apart). About half of the original screws had been replaced with hex heads. Next time use Tef-Gel ! (See the update for August 2016, describing how some screws backed out, possibly because the Tef-Gel was too slippery. Next time I am using Loctite in situations like this where the fasteners are subjected to vibration and variable loads).
I am considering how to modify this. I think I’m going to add a second block and line at the end of the cable that would double the purchase. However, that would reduce the range of motion of the slider and mean it needs more line.
Update: December 18th, 2011.
Finally decided to implement the idea above. I decided I didn’t want to detach the stainless cable from the block used in the 3:1 purchase, so I simply added a new block in the 3:1 section to replace it, and used it for the 2:1 purchase part. So now, starting from the aft end of the boom, the outhaul cable runs around the sheave at the end of the boom, and forward until it reaches the first block. This block has one line around it – going from the front of the boom, around the sheave and back to the start of the 3:1 purchase.

Next, the 3:1 purchase starts with a block with becket. The line travels the same way as before, around a third block (the original one) at the front of the boom. It exits the boom starboard as before.

One problem I had to solve was how to attach the fixed end of the 2:1 line. The simplest solution was to drill a 1/4” hole through the front of the boom on the port side at the bottom, where the gooseneck narrows. I drilled the hole and reamed it out with a Dremel tool to remove edges. The line passes through the hole and is terminated with a stop knot. It’s easy to pull out (when the outhaul is not under tension) and inspect for chafe. We’ll see how it holds up. I’ll probably add some chafe protection to it.
Lastly, the line I used is some 3/16” Samson Ultra Lite, which has a core of Dyneema and a polypropylene cover. The Dyneema means it should not stretch much (a good thing when the wind gets up). I had a length of this from a previous project (that didn’t work out). Problem is that this stuff is really hard to splice because it’s so small and tightly woven. That’s why I used a thimble and simple knots instead of splices. This stuff is immensely strong so I don’t care if it loses half its strength at the knots.
The line for the 2:1 purchase is about 16 feet, and for the 3:1 is only about 10 feet. I may shorten the latter once I get the sail on. No need to have unused line dangling on the boom.
Anyway, the resulting systems works great – at least on the bench. I have about 1 or 1.5 feet of motion of the outhaul, more than I need. Very keen to see how it works out in practice. The 6 to 1 purchase seems very effective. I can put a lot of tension on the outhaul with just one arm.
Update: April 7, 2012
The plastic bearings on the outhaul slider were worn, and one broke off as I was messing with it. I replaced these with nylon bushings that I got from the local Henerey’s Hardware Store. They are just under 0.5″ ID, 0.75″ OD and about 0.375″ long. I cut them to a length of 0.25″. I then soaked them in very hot water for a few minutes and forced them over the barb at the end. It took some persuasion with a wood block and hammer to get them to stretch over the lip. But it worked well, and they fit nicely into the boom and won’t come off. We’ll see how they hold up over time. The original bearings are just plastic, they don’t seem to be anything special. (See update below for August 2016, when the slider failed, breaking at the piece of metal that runs through the track in the boom).

Update October 2012
The summer is over and our sailing trip to Canada and around Vancouver Island gave plenty of opportunities to use the outhaul. It works **great**. The purchase makes it possible to tighten the outhaul under most conditions with ease. Only when the wind is up and the sail is fully loaded does the purchase not enable me to tighten it. Luffing momentarily does the trick of course. And I’ve no worries about the damn line breaking. The only change I’d make is to ensure it won’t hang up on any fasteners that stick into the boom too far. Some of the fittings were installed by previous owners with very long screws, and the blocks on the inside can run into these when the lines are not tight. Easy to shake loose though. Someday I’ll shorten some of them, but for now, it works just fine.
Update August 2016
During our Pacific crossing this summer, we had four weeks of mostly non-stop strong winds, and during this time the outhaul failed in two ways: the slider holding the clew to the boom broke off, and the internal lines twisted and could not be pulled. The metal plate between the internal and external parts failed from what looked like metal fatigue. Fortunately, with a loose footed main, the clew simply lifted a little higher off the boom. Also, the lines twisted and became stuck when the outhaul was pulled in tight which was what we wanted for 95% of the time. But it was a bit unnerving.
I will be replacing both internal blocks with blocks that have swivels to hopefully eliminate the twist that was likely caused by the wire under tension untwisting a little. And I will replace the wire with a piece of dyneema, shackled directly to the clew of the sail rather than the slider. I will add a loop of Amsteel around the boom and through the clew to keep it within a couple of inches of the boom.
I also have found that fasteners protected with TefGel do indeed come out after several years with little sign of corrosion. However, the constant shaking and movement of the boom seems to lead to some of the screws on the boom backing out. I will be replacing the TefGel with some Loctite-Blue, hoping for good corrosion protection without the problems with fasteners falling out.