Replacing the White Metal Bearing
July 26th, 2011 | by Marilyn | Published in Maintenance and Repairs, Upgrades
Nicholson 38’s do not have a cutlass bearing, they have a white metal bearing in a stern tube. This works well as long as you keep it well greased, and that’s why there is a stern tube greaser integrated into the stuffing box. But after 37 years, the white metal bearing was worn enough, you could wiggle the shaft quite easily and make it go “thump thump thump”. It was well past time to replace the bearing.
We planned a haul-and-hang for Thursday afternoon at 11AM just to replace the prop. On wiggling the shaft, we decide, no – it’s time to replace the bearing, so we blocked up on the hard and called Port Townsend Foundry. Pete said he could help us out, so we started on the job. By 5:00PM that same day, we had the stern tube and shaft in Pete’s hands, and by 5:30PM the next day (friday), Pete delivered them back to us with a new white metal bearing custom fit to our worn shaft. We put it back together on saturday, using supplies from Sea Marine. On Monday morning at 7AM, we put back in and headed on our way. Things never go this smoothly on boat repair. I feel like we are living a charmed life.
Here’s the steps for how to do it, if you are lucky enough to find someone who knows what “white metal bearing” means. (Pete says he’s glad to travel to Europe to cast white metal bearings!) Also check the photos below that illustrate these steps.
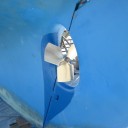
- Remove the prop and key. Our key was badly stuck, but with the help of PB Blaster and some gentle persuasion, we got it out.
- Remove the shaft brush and bonding wire.
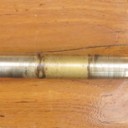
- Take apart the aft most shaft coupler. If the nuts are ceased, just cut through the nut and bolt – don’t waste time trying to free them. These are cheap Grade 8 steel bolts, 7/16” diameter, 2.5” length, and so easily replaceable. Be sure to look closely had how the coupler is connected. To free the tailshaft, you really only need to cut off the two bolts that hold the intermediate shaft to the coupler. The other bolts hold the tailshaft to the coupler. The coupler will be left on the tailshaft, so there is no need to remove those two bolts (though we did, because we didn’t understand this arrangement until afterwards.)
- Once the aft most coupler is undone, the intermediate shaft is free to move downward enough (thanks to the forward coupler flexibility) so that the tailpiece can be pulled inboard to remove it from the stern tube. (Afterwards, we supported the intermediate shaft to protect the forward coupler).
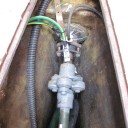
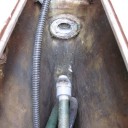
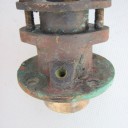
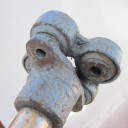
- Remove the stuffing box, which is held to the deadwood with 4 retaining screws. We needed a giant pipe wrench to unscrew it from the stern tube. Be careful to not damage the packing gland screws, which are not easily replaced! In fact, we recommend removing the packing gland from the stuffing box before using the pipe wrench to ensure the threads of the packing gland screws are not damaged. We were able to remove ours without affecting the new packing we had just installed a month earlier.
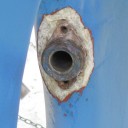
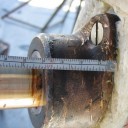
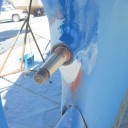
- Back outside, chisel the gelcoat/filler away from the aft stern tube gland to expose the 2 holding setscrews. The screws are in a plane about 1.5” back from the aft face of the gland (see photo below).
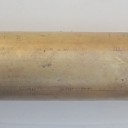
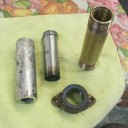
- Remove the screws and pull out the stern tube. This was easily done.
- Remove the aft gland from the stern tube. Ours turned off by hand.
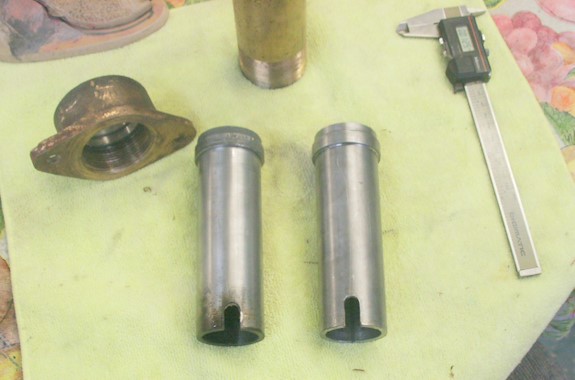
- Give the shaft, stern tube and aft gland to your local foundry. You might also want to provide the white metal bearing drawing, which shows the dimensions for the part, and how the inner diameter should have 3 machined grease grooves. Warn the foundry that the existing white metal bearing is keyed into position! (Drawing and other information available as a PDF at here on the Nicholson38.org website
- While waiting for the foundry, clean all the parts. The stuffing box had been installed with mastic, which was still gooey. We cleaned it off by first scrapping off the excess, and then using “Goop Off” to remove the residue. We did not attempt to remove all the grease from the stuffing box. We also did not attempt to clean all the old mastic from the deadwood.
- Also prep the hull area around the aft gland for refilling. Sand the hull back a little so can add filler in a lap joint.
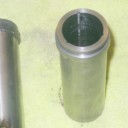
- Pete from Port Townsend Foundry returned the parts with the new white metal bearing already installed in the stern tube. He was able to remove the original white metal bearing in one piece. He did not cast the new one into the stern tube – he instead cast the part separately and then machined it so it was a perfect fit. Very nice work, and we highly recommend Pete and Port Townsend Foundry!!!
- Use a lightweight oil to check the fit of the white metal bearing to the shaft. (We used mineral oil). This step also helped us understand how much force was required to fit the shaft into the bearing (the answer was, quite a lot since the shaft is less worn aft of the bearing. Once the bearing slid over that “wide spot” on the shaft, the bearing fits very nicely on the worn shaft area.)
- With the stern tube still remove from boat, fill the grease channels of the white metal bearing with grease, and also fill the stern tube cavity perimeter with grease. We actually filled it after the stern tube was installed, but decided it would have been easier to do this prior to installation.
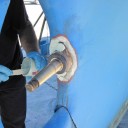
- With the aft gland installed already (hand tightened only), goop up the stern tube with Dolphin bedding compound, and insert from outside. Install the retaining screws on the aft gland to the hull, but recognize that the stern tube may need to be rotated 180 degrees to get the stuffing box installed in the correct orientation.
- Assemble the inboard flange, using Dolphin bedding compound. Tighten the flange using a pipe wrench (again, if the packing gland is still attached, don’t damage those precious screws.) The inboard flange must be installed so the greaser fitting is on top again – (remember, the stern tube can be twisted 180 degrees from outside if needed).
- Clean the Dolphin bedding compound out of the greaser fitting.
- Reassemble the stuffing box. Do any cleanup of those precious screws that are required.
- Lube shaft with light weight oil and insert into stern tube.
- Reconnect the shaft coupler with those new Grade 8 7/16” 2.5” length screws. We used washers too. Tighten firmly! We used red loctite so the nuts will not vibrate off, but the local mechanic said we should have used blue loctite so we could retighten later.
- Reconnect the stern tube greaser and the shaft brush.
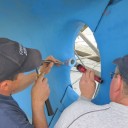
- Use 3M Marine Premium Filler (with Blue hardner for our 70 F summer weather) to fill in around the aft flange, making a nicely faired surface. Since the material can only be built-up to 3/8” thickness, it required 2.5 ounces, then another 2.5 ounces to have enough. We then sanded it back to fair using 80 grit paper. This worked very nicely!
- Apply bottom paint to the newly faired area.
- Before fitting the prop, hone the shaft-to-prop to ensure a good fit. We used TimeSaver fine (yellow) grit grinding compound. Clean up well afterwards.
- Fit the shaft key carefully. Pete made us a new brass shaft key (yes, brass, which he recommended as sort of a “sacrificial anode” if galvanic corrosion does occur). It took a very long time to fit the key so that it did not bind the prop. The method to do this is first dry fit the prop without the key, and mark the prop position on the shaft. Then put on the key and see if the prop dry fits to the same position. If not, the key needs more work. It would have gone faster if I had more coarse sand paper (I had only 200 grit.)
- Coat the shaft with Tefgel. Install the key (we did not coat the keyway with tefgel, only because we forgot)
- Slide on the prop, and tighten the castle nut so a new cotter pin can be inserted. The original mark on the shaft indicating prop position during dry fit should disappear as the castle nut is tightened.
- Coat the prop, nut, shaft and exposed keyway with Lanacoat (be sure to wear a good pair of gloves because Lanacoat is smelly sticky stuff!)
That’s it! Because of the excellent help of Pete from Port Townsend foundry, and the eager assistance of Matt and Larry as Sea Marine in tearing apart our boat to get out the stern tube – this unplanned major repair was completed in 3 days. FANTASTIC!
The shaft has noticeably less vibration, particularly at low RPM when the engine vibration is less. I suppose if we replaced our original engine mounts, things might even be better.